The Provident Homemaker
  • Recipes and Info
    • Making Bread
  • My Blog
  • Favorite Resources
  • Documents and Files
  • 52 Weeks of Building Storage

Week 40- Free Cookbooks for Using Food storage

1/19/2020

2 Comments

 
Picture
To help with building your year's supply (this is Week 14 of 26), see this chart. 
 
Do you have some food storage now, but need more recipes to use it? Check out these eleven FREE cookbooks, plus some extra resources like a book that teaches you how to can food, one on nutrition and one on REALLY frugal cooking and homemaking.
Picture
1. Bee Prepared Pantry Cookbook. 67 amazing pages.  

Picture
2. New Ideas for Cooking with Home Storage (also found here)--
​created to be used with the foods at the dry-pack canneries of the Church of Jesus Christ of Latter-day Saints.  You can no longer dry pack food there, but can still purchase products already packaged. 
 
​

Picture
3. A Guide to Food Storage for Emergencies—compiled by the USU Extension Office. 120 pages. 
 

Picture
4.The Wooden Spoon Cooking School collection- this was a pilot program by the Church of Jesus Christ of Latter-day Saints.  The same ladies who created the Bee Prepared Pantry Cookbook were commissioned to create the class materials, so this is basically an expanded version of Bee Prepared. There are individual sections on the following topics: 
Introduction (note that the ‘length of storage’ information is outdated, per BYU Food Studies)  
Intro- Commodities, Family Assessment, Family Plan, Skills & Equipment
Legumes
Oats, Honey, and Sugar
Wheat
Rice and Pasta
Powdered Milk
Seasonings
A Meal in a Bag- quick meals with everyday, three-month supply foods


Picture
5. All Is Safely Gathered In: Family Home Storage Basic Recipes—compiled by the Church of Jesus Christ of Latter-day Saints, and sent with food storage boxes/kits.  4 pages, 11 recipes. 

Picture
6. Shelf Stable Recipes-- family favorite pantry recipes submitted by readers of FoodStorageMadeEasy.net   
​58 pages.  Uses long-term storage foods as well as some shorter-term ones. 
​

Picture
7. Use it or Lose It— another “food storage cooking school,” compiled by the Utah State University Extension Office. 17 pages. About half of the pages have recipes, with a focus on wheat and dry milk powder; the rest is good information on how to obtain, store, and rotate your food.

Picture
8. Cooking with Dry Beans—compiled by the USU Extension Office. 13 pages.

Picture
9. Whole Kernel and Bulgur Wheat: Preparation and Usage—compiled by the USU Extension Office.  57 pages, so you know there’s a lot of variety. It doesn’t mention hard white wheat vs hard red wheat partly because white wheat had not quite hit the public scene in 1992. ​

Picture
Short term food storage rotation
​
10. 3x5 card/photo album cookbook—3x5-sized cards to cut out and fit inside a small photo album that holds 72 photos. ​

Picture
11. Crockpot Freezer Meals with Five Ingredients of Less, from TheFamilyFreezer.com.   25 main dish recipes to use your short-term (“regular food”) storage. Go to the main webpage, https://thefamilyfreezer.com/ for many more recipes. 


Other great resources:

Nutrition and Diet—includes charts on vitamins and their role in the body. Church of Jesus Christ of Latter-day Saints, 26 pages.

USDA Guide to Home Canning – a self-taught course in how to can. 
 
Frugal pioneer recipes- ten recipes, printed in the July 1972 Ensign magazine.

American Frugal Housewife, 1838. The twenty-second edition.(!)

“Dedicated to those who are not ashamed of economy” and “Economy is a poor man’s revenue; extravagance, a rich man’s ruin.”  The introduction begins, “The true economy of housekeeping is simply the art of gathering up all the fragments, so that nothing be lost.  I mean fragments of time, as well as materials…and whatever the size of a family, every member should be employed either in earning or saving money… The sooner children are taught to turn their faculties to some account, the better for them and for their parents.  In this country, we are apt to let children romp away their existence, till they get to be thirteen or fourteen.  This is not well. It is not well for the purses and patience of parents; and it has a still worse effect on the morals and habits of the children. Begin early is the great maxim for everything in education. A child of six years old can be made useful; and should be taught to consider every day lost in which some little thing has not been done to assist others.”
__________________________

If you like old cookbooks, this website has more than 75 of them, all waiting for you in digital format. 
 
Thanks to prepperssurvive.com for alerting me to the old cookbook digital collection!

2 Comments

Week 21- Making Your Own Taco Seasoning, Weekly Assignment

9/1/2019

0 Comments

 
Picture
Weekly Assignment:   B4-3- This is the last week of doing this for your 3-month food supply items! Next week you’ll start ‘B4-3’ with your nonfood items like hand soap, laundry soap, and toilet paper.

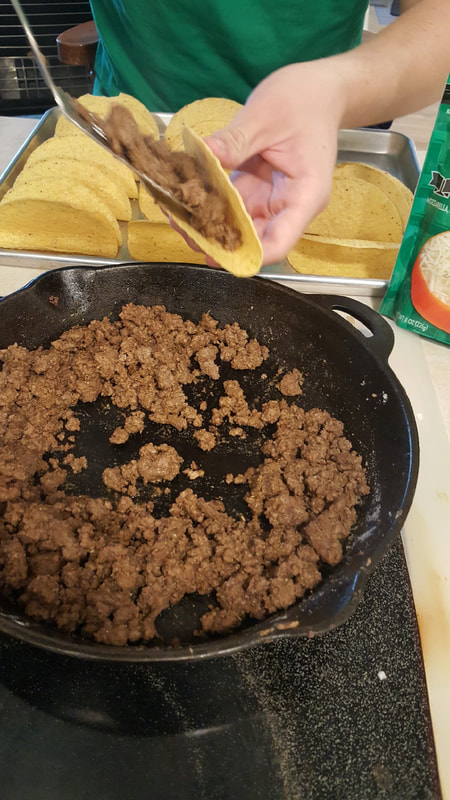
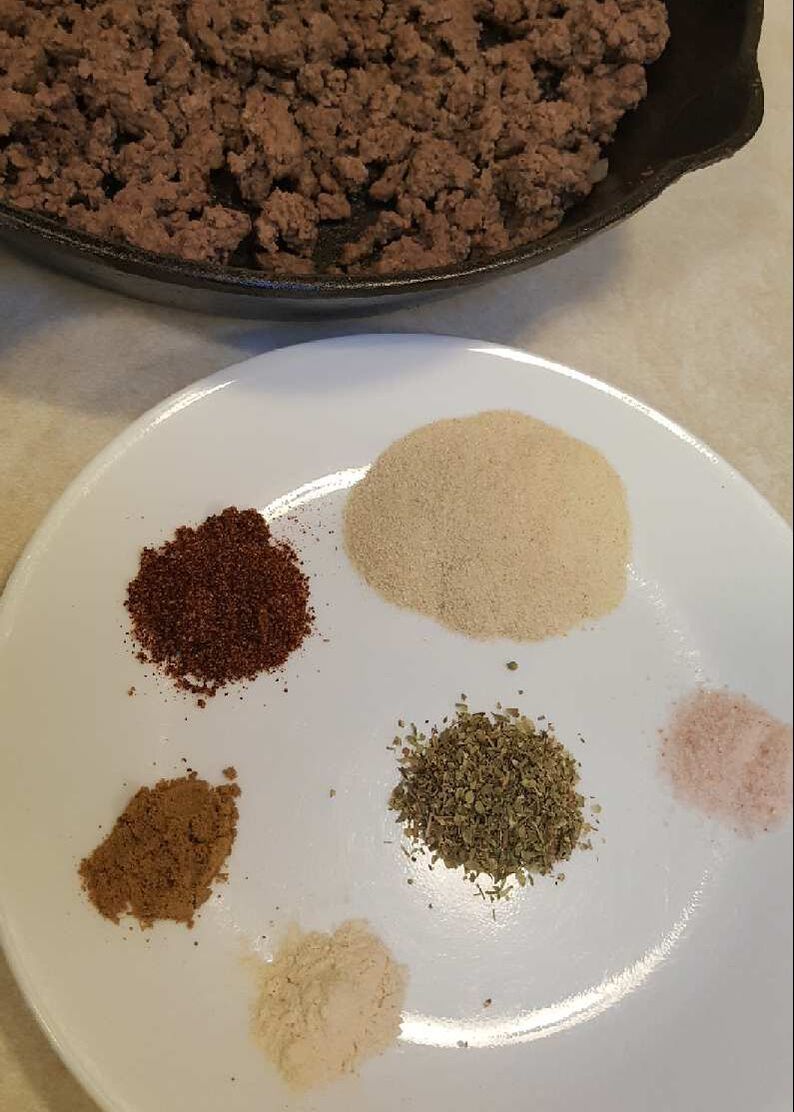
Why spend extra on pre-made seasoning packets when you likely already have all the ingredients? Save some money by making your own seasoning packets, or adding the spices directly to your meat.

Taco Seasoning
2 Tbsp. dried onion
1 tsp. oregano
1½ tsp. chili powder
½ tsp. garlic powder
½ tsp. cumin
½ tsp. salt

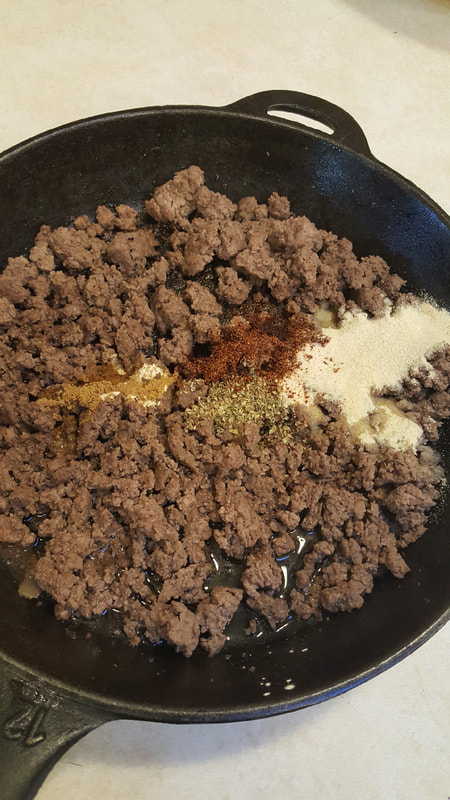
This is enough seasoning for 1 pound of ground beef or turkey, or a pound of freshly cooked pinto or black beans.  Cook the meat until browned, add the seasonings and ½ c. water or 8 oz tomato sauce; simmer for a few minutes until it’s the consistency you like. Want to make your meat go further?  Add any of these: 1 cup of cooked rice, a handful of quick-cooking oats and a bit of extra water (or 1/4 c to 1 c. leftover cooked plain oatmeal), a can of beans (drained), 1/2- 1 c. shredded vegetable like carrot or zucchini, 1-2 c. cooked cracked wheat.

The seasoning can be adjusted to your own tastes; if you like cumin, up to 1½ tsp. can be good.  I’ve also seen people add crushed red pepper or cayenne pepper, black pepper, smoked paprika, and a couple tablespoons of brown sugar.  What if you overdo the spices?  See how to fix that, here.  

Something to know about chili powder is that there are two general kinds-- the first is nothing but powdered chili peppers, with a huge range of heat, depending on the type of pepper used. (If it's a spicy one, 1 1/2 tsp. of this in your recipe will likely be too much!)   The second kind of chili powder is a mixture of spices-- including powdered chili peppers- but also including things like cumin, oregano, garlic, salt, and more.  Check the label of your spice bottle to see what yours is made of; if it has salt, you may need to reduce the separate amount of salt. If it doesn't have salt, you may want to add 3/4 tsp instead of 1/2 tsp.

Multi-batch Taco Seasoning (some for now, some for later)
½ c. dried onion
1 Tbsp + 1 tsp oregano
2 Tbsp. chili powder
2 tsp. garlic powder
2 tsp. cumin
2 tsp. salt (use 1 Tbsp if your chili powder doesn’t contain salt)
 
Stir together in a small bowl.  You can keep the whole batch in a glass spice jar and use 3 Tbsp each time you cook 1 lb of burger for tacos, or store single-use quantities in snack-size ziptop bags.  For single use size, divide into four roughly equal portions.  Put each one in a small ziptop bag or other airtight container.  Label, date, and store in the cupboard or freezer.
 
Store in a dark cupboard or in your freezer.

You can even add tomato powder (see here how to make it and how to use it in your recipes)


Use this mix in taco salad, soups (1 batch of seasoning for 1-2 quarts of liquid), salad dressings, dips, Mexican dishes, as a rub for meat, on kebabs, and of course for tacos. (Add 1 tsp seasoning mix to one drained can of beans.)

Want to make more home-seasoned basics?  


Marinara sauce
​

BBQ sauce

Or maybe you're needing ways to use all the tomatoes your garden is producing:

https://theprovidenthomemaker.com/my-blog/category/tomatoes
Picture
Picture
0 Comments

Week 12- Homemade Pizza Pockets

6/29/2019

0 Comments

 
Picture

Week 12 assignment-- Going off your  Inventory Shopping List and this week’s sales, buy the 3 months’ worth of as many different items as you can (= Buy For 3) as your new budget allows.    You'll do this through Week 21.

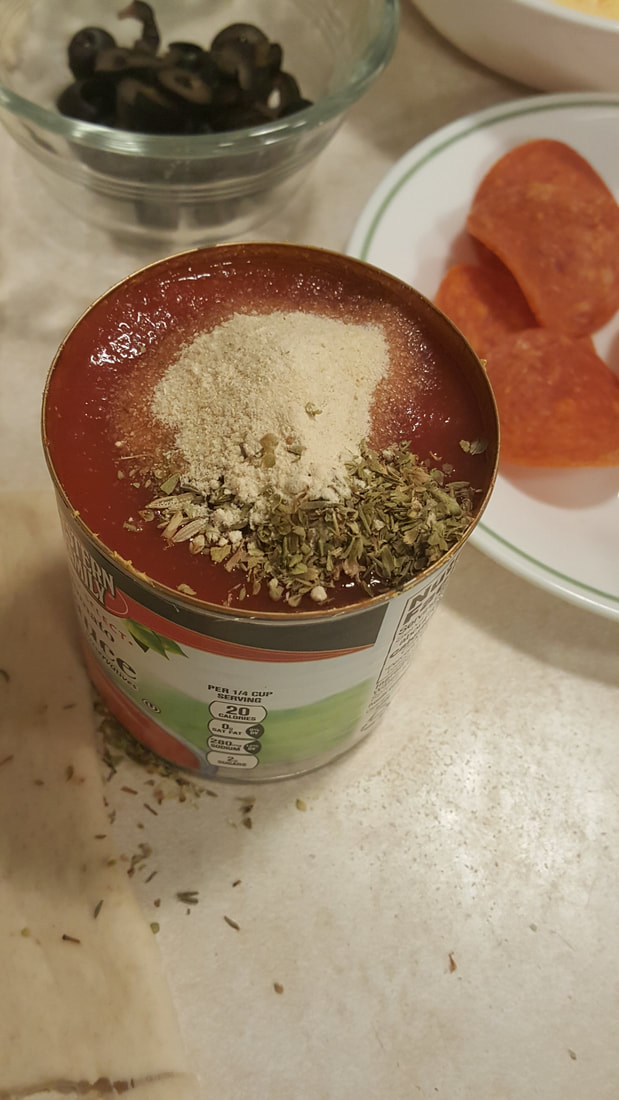
Have you ever made pizza from scratch?  It's delicious. To get directions on making pizza, go to the basic bread recipe, and scroll down until you see “Pizza”.  Directions are there, including for making enough of a super-simple red sauce for your pizza.  You'll want the sauce for pizza pockets, too.

Pizza pockets are fun, portable, completely customizable, AND they freeze well.  You can make them to suit food allergies; nondairy cheese can be used in these if you like. This recipe can be doubled, tripled, quadrupled  make whatever quantity you want to make for dinner plus extras for packable lunches. 

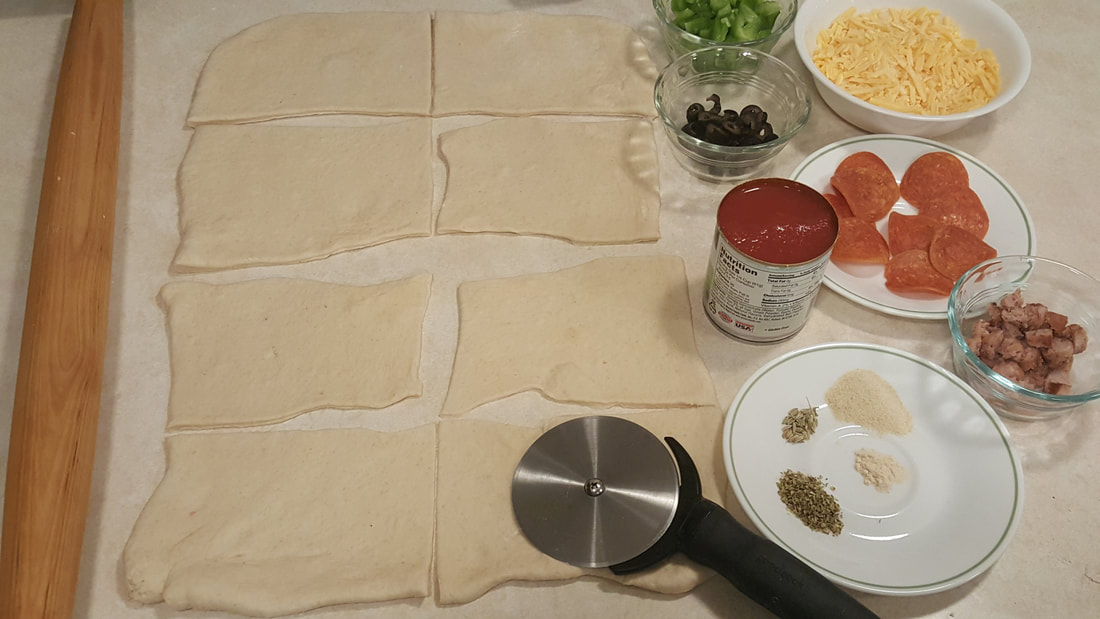
To make 8 regular pizza pockets or 6 large ones, you'll need:

-One loaf’s worth of bread dough

-8 oz. shredded cheese

-One 8-oz. can of tomato sauce (you'll only use half)

-Dried or fresh herbs- oregano, basil, thyme, garlic powder, onion powder, ground black pepper, rosemary, fennel (use whatever you have and like.  I often use only oregano, garlic and onion powder)

-Toppings-- crumbled bacon, pepperoni, cooked sausage, leftover chopped cooked chicken or hamburger, mushrooms, zucchini (shredded and squeezed dry), chopped bell peppers, spinach leaves, diced tomato, olives… Plan on ¼- ½ c. of each topping, for each 8 pockets you make.
 
Roll dough out as you would for pizza crust, a rectangle about 8x15”.  While the dough relaxes after rolling, pull out your sauce, cheese, and other toppings.  Oil a 12x18" baking sheet, sprinkle with cornmeal for extra crunch, OR line with parchment. After your toppings are ready, roll the dough larger, to make it measure about 13x19". 

With a pizza cutter or knife, cut the rolled dough down the center the long way, then in fourths the other direction. (See photo, below.) This will give you eight rectangles, each about 4x6”.

Picture
Picture
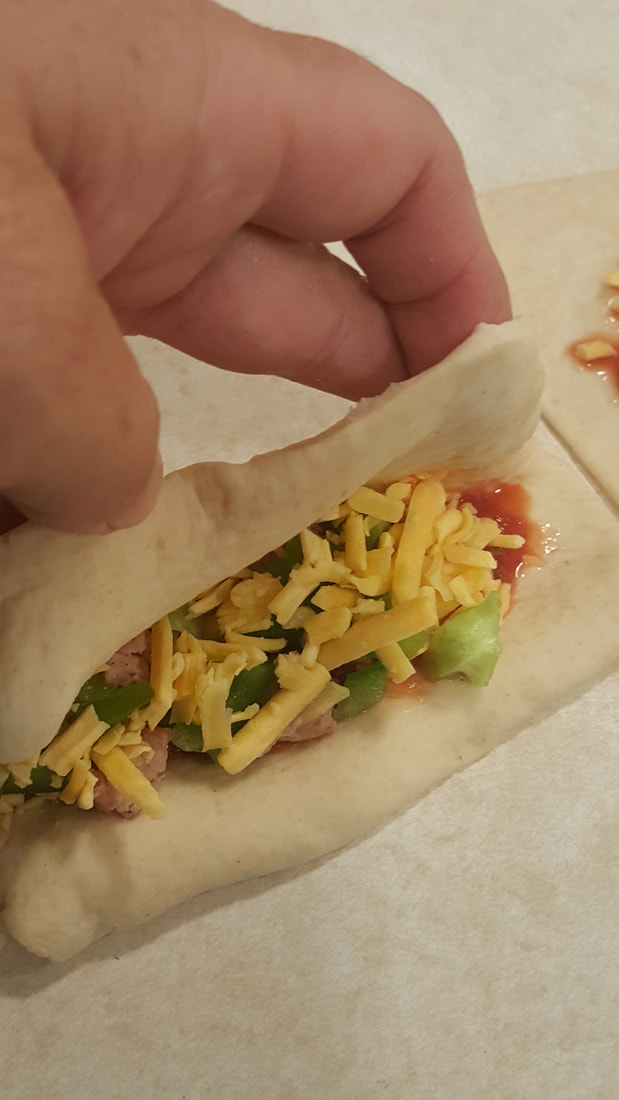
Spread pizza sauce on one long side of each rectangle, leaving a 1” clean border around those edges. Sprinkle with any toppings and about 2 Tbsp. of cheese. Brush the edges of the bare half with water; this will help the pockets seal better around the edges after crimping.

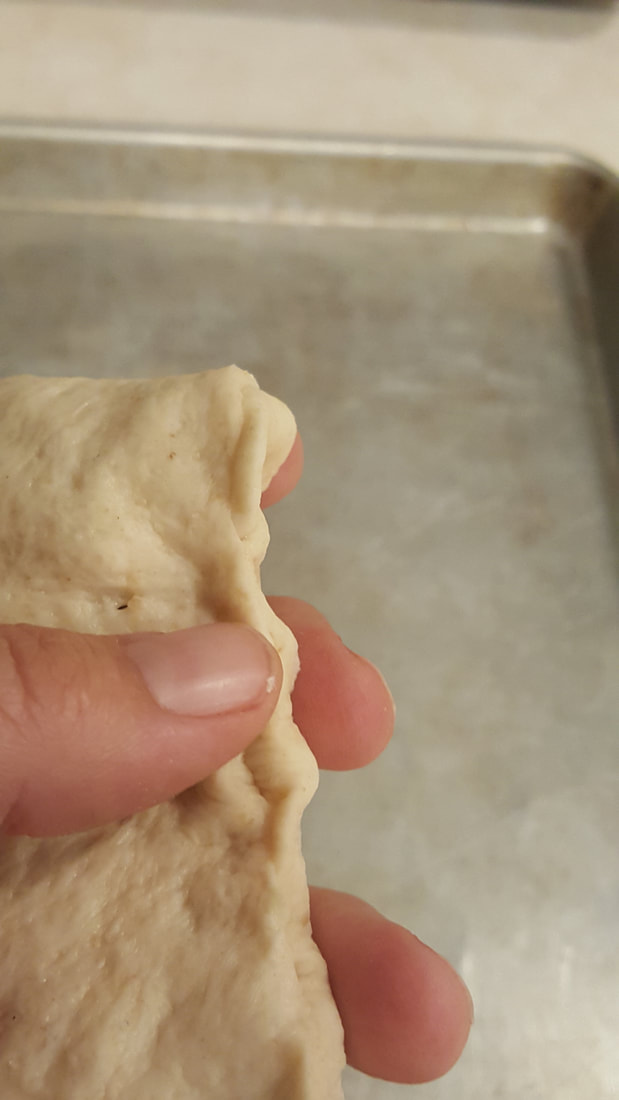
Fold each pocket in half the long way, lining up edges.  Crimp (pinch) the edges with your fingers or by flattening with the tines of a fork.  Set on the oiled baking sheet. Cover with a kitchen towel and let rise for 15 minutes. While they rise, preheat the oven to 400° F.  Remove the kitchen towel. 

For shiny rolls, brush with beaten egg (whites, yolks, or both) before baking, or brush with milk or butter for better browning. Bake about 20 minutes, or until browned on the bottom. Remove to a cooling rack.  Let cool at least 10 minutes before eating; they continue baking internally in those first several minutes. 


Refrigerate or freeze any that you didn't eat right away.

If you’re going to freeze them, first cool them completely.  Freeze them on a baking sheet, and then transfer to a ziptop freezer bag, labeled and dated.

Picture
Picture
Picture
Picture
Picture
0 Comments

Week 5 assignment and DIY Instant Oatmeal Packets

5/11/2019

0 Comments

 
Picture
Your assignment this week is to look through the grocery ad for things on your inventory list that you need. With the budgeted amount of money you have (ballpark figure is $14 per week, per person) buy your three months' worth of however much you can on your list.

Do you like to use instant oatmeal?  You can save money (and know exactly what you're eating) by making your own. It's so quick and handy to have it all made up!
 
Homemade Instant Oatmeal 
4 cups quick oats (oatmeal), gluten-free if you need them
1-3 tsp. cinnamon
½ - 2/3 cup brown sugar*
½ - 1 tsp. salt
optional: 1/2 cup dry milk powder
optional: 1 c. chopped dried fruit or toasted nuts

Put 1 ½ c. of the oats in a blender; blend on high until almost powdery.  Dump this into a medium-sized mixing bowl; stir in cinnamon, brown sugar, salt, and milk powder and fruit/nuts if you’re using them.
 
After making it for the first time, see if it needs adjusted for your family’s tastes-- take 1/4 c. of this mix, combine in a bowl with ½ cup water, and microwave for 60 seconds. Taste it.
Is it great? Does it need more cinnamon? Sugar? Salt?  Add as needed, then cook another bowlful to see.  Take notes so you don’t have to do this next time.  😊 
 
Store in a canister, a quart-sized ziptop bag, or pre-portioned into snack-sized ziptop bags.
This batch can easily be doubled or tripled.
 
You can pre-portion these into snack-size baggies (then reuse baggies!), or just keep a measuring cup in the canister or bag. If you want individual servings measured out ahead of time, place either 1/2 c. or 1/3 c. mix in each baggie.

TO USE:
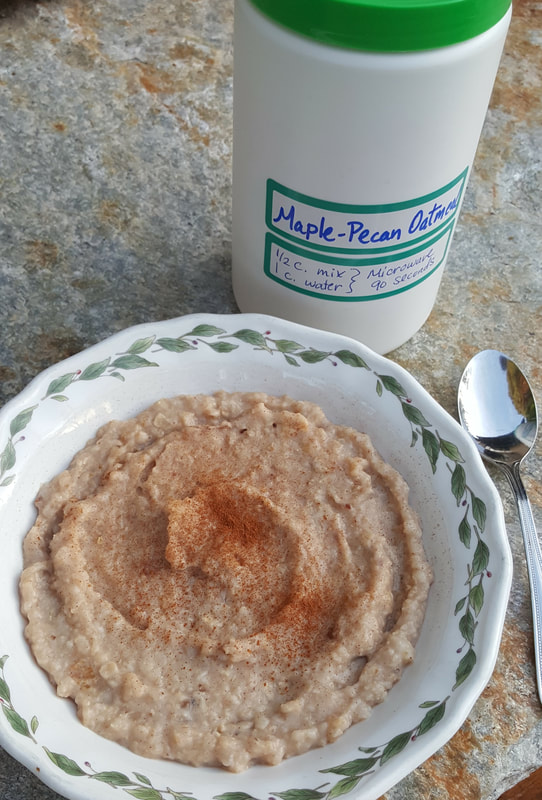
One large serving:  use ½ c. mix and 1 c. water.  Microwave 90 seconds; let stand. 
One small serving: use 1/3 c. mix and 2/3 c. water.  Microwave 60 seconds; let stand.
For four large servings (or 6-8 small ones), use four cups boiling water and add 2 to 2 ½  cups oatmeal mix.
Adjust water and/or mix to make it as thin or thick as you like.  

    
* For children who aren't yet accustomed to sugary oatmeal, use 1/2 cup brown sugar.  For those sugar-addicted husbands, you may need to add more. Regular sugar, evaporated cane juice, or an appropriate amount of stevia may be used. 
If your brown sugar is lumpy, it can be added to the blender with the 1 ½ c. of oats and blended with them.
 
Here are some flavor combinations; the sky's the limit!

Apple Cinnamon- Use the higher amount of cinnamon; you might even go up to 1 ½ to 2 Tbsp. Stir in 1 c. chopped dried apples.

Apricot Almond- Add 1 tsp. almond extract to the oats being blended.  At the end, stir in ½ c. finely chopped dried apricots and ½ c. chopped toasted almonds.

Banana Maple- Add ½ tsp. maple extract and ½ to 1 c. banana chips to the oats when they’re blended.

Chai Spice- Use 2 tsp. cinnamon, 1 tsp. ginger, ½ tsp. cardamom, and ¼ tsp. cloves. (If you like, you can also add ¼ tsp. ground black pepper and ½ tsp. allspice.)  For Vanilla Chai, add 1 Tbsp. vanilla to the oats when they're blended, or use vanilla powder.
 
Date Nut- Use the higher amount of cinnamon. At the end, stir in ½ c. finely chopped dates and ½ c. toasted chopped walnuts or other nut.  TIP- if you chop the dates and the nuts together, the dates won’t stick to your knife as badly.
 
Dinosaur- Use the higher amount of cinnamon. Stir in ¼ c. dinosaur-shaped sprinkles.
 
Maple Brown Sugar- Add ½ tsp. maple extract to the oats being blended. Use the higher amount of brown sugar (dark brown if you have it), and the lower amount of cinnamon.

Pumpkin Spice- Use 2 tsp. cinnamon, plus 2 tsp. ginger, 1 tsp. nutmeg, and 1/2 to 1 c. pumpkin powder. Best if you also use the 1/2 c. dry milk powder.

Raisin, Apple & Walnut- Use the higher amount of cinnamon.  At the very end, stir in ½ c. chopped raisins, ½ c. chopped dried apple, and ½ c. chopped toasted walnuts.

Strawberries and Cream- Use either ½ c. dry milk powder, or ½ c. powdered creamer. Stir in 1 c. chopped dried or freeze-dried strawberries. You can also make Raspberries and Cream, Blueberries and Cream, or Peaches and Cream this way.
 
Very Berry- Add 1 tsp. vanilla to the oats being blended. Use the lower amount of cinnamon.  Omit brown sugar, and use 1 c. of the berry drink mix from the Home Storage Center. Stir in 1 c. chopped dried cranberries or other dried berry.
0 Comments

Homemade Vegetable Broth Powder

1/23/2014

1 Comment

 
I have the HARDEST time finding bouillon that doesn't contain MSG.  Here's a solution:  no MSG, no fillers, no preservatives.  Only what you choose to put in it.

This recipe was adapted from Traci's Transformational Health Principles by Traci J. Sellers

Vegetable Broth Powder     (makes about 1 1/2 cups)
​
1 cup Nutritional Yeast (to make your own, see here)
1/4 cup RealSalt (or Himalayan salt; something with those trace minerals)
1 Tbsp. onion powder (see how to make your own, here)
1 1/2 tsp. turmeric
1 1/2 tsp. dried parsley
1 tsp. dried dill weed
1 tsp. marjoram or oregano, optional
1 tsp. dried lemon peel, optional
1/2 tsp. celery seed
1/2 tsp. dry basil
1/2 tsp. ground thyme 

 Put everything except parsley in a blender or food processor, in the order given.  Blend until
 powdered.  Add parsley, pulse just enough to chop it a little bit (you're aiming for small bits).  Store in an airtight container indefinitely.  

To use, add a heaping 1/2 tsp. per cup of water, or 1 Tbsp. of powder  for every quart of water.

1 Comment

Make your own Pumpkin Pie Spice

11/22/2013

0 Comments

 
Have you ever started a recipe only to discover that it called for "pumpkin pie spice"?  And there was no such thing in your cupboard?  

You can make your own very easily.  Mix a big batch and fill a jar, or just use the ratios below to put directly in your recipe.  For instance, if your recipe calls for 2 tsp. pumpkin pie spice, use double the amounts below.  No need to stir them together first, either, just drop them in.  If you have cinnamon but not all three of the others, you can leave one of them out and still be fine.  (Just don't leave out the cinnamon!)


Pumpkin Pie Spice Makes 1 teaspoon. 

1/2 tsp. ground cinnamon 
1/4 tsp. ground nutmeg
1/8 tsp. ground ginger
1/8 tsp. ground cloves

Mix ingredients well. 

Bigger batch, for filling a spice jar:  
Makes 1/4 c (4 Tbsp or 12 tsp.)
2 Tbsp. ground cinnamon
1 Tbsp. ground nutmeg
1 1/2 tsp. ground ginger
1 1/2 tsp. ground cloves


0 Comments

Homemade Dairy-free Spreadable Butter

2/9/2013

12 Comments

 
Picture
Picture
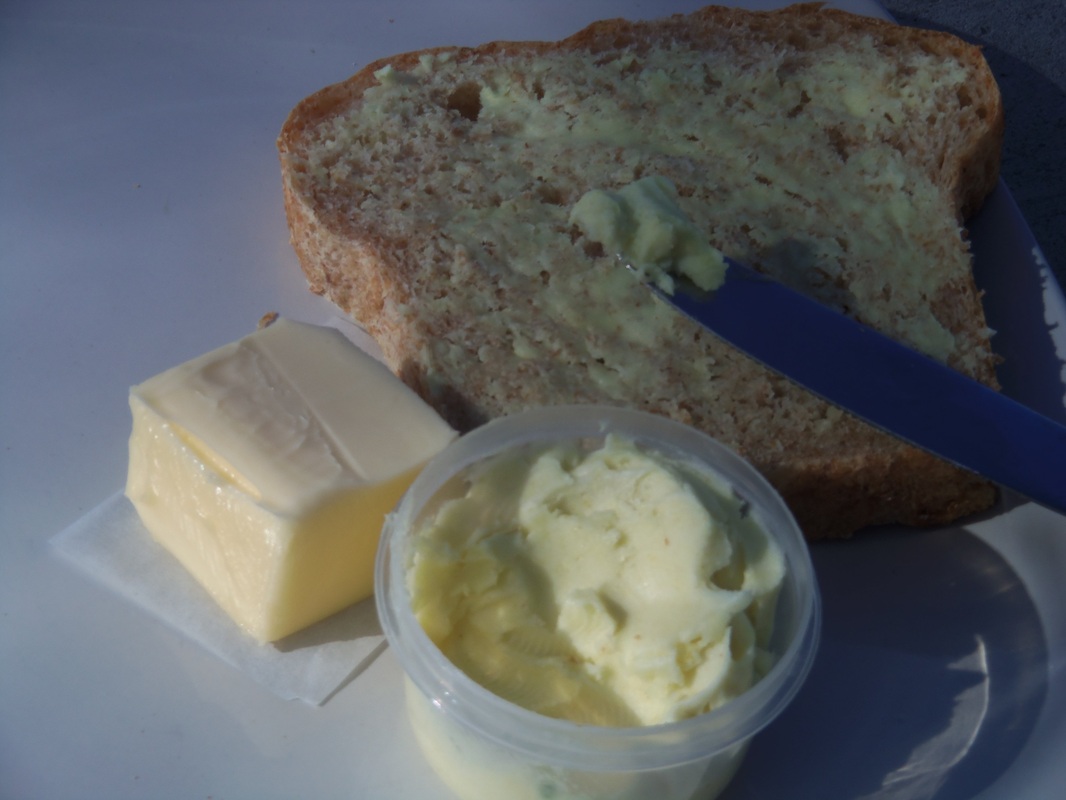
My no-butter spread still tastes like butter plus is made with healthy fats. The spread is in the container; dairy butter is on the left for comparison.
I am so excited!

But first- if you've noticed a shift towards gluten-free and dairy-free recipes lately, good noticing!  I. Love. Dairy.  I even milked a cow every day as a teenager so I had the fresh great stuff.  But sometimes people have health problems with certain foods.  So far we've discovered that two of my children get stomach aches when they drink milk.  One of my daughters has excema on her arms that just has not cleared up.  It usually comes and goes, especially in the winter, but she's had it for two months straight.  So I've taken all dairy and wheat items out of her diet to see if those common allergens could be a reason for it.  I'm still cooking normally for everyone else, but have necessarily been experimenting with this other way of cooking.  And here's the latest and greatest:

Butter.  Sort of.  It tastes like it, anyway.  And spreads beautifully.  It even cooks like butter.  I've creamed it with sugar and made a cake, made brownies, melted it on muffins, spread on toast, made honeybutter, and made dairy-free cream of broccoli soup with it.  Yum.

The idea was sparked by reading a label on a small tub of honey butter.  Turns out there was no butter in it at all, but tasted as though it did.  Reading through the list- hydrogenated soybean oil, honey, citric acid, soy lecithin, artificial colors and flavors- it occurred to me that if THEY could make something taste and spread like butter, then maybe I could, too.  So I started researching what the flavor components were in butter and what other foods contain them too.  It was fun to read about- ketones, diacetyl, acetoin, reactions between aldehyde and niacin.  (But, dang it, how come if I was setting a good example of work, study, and loving to learn, I had to remind my daughter every 20 minutes to get back to her schoolwork?!)

Anyway, I found some foods that naturally have some of the same flavor components as butter, and used one that covered the bases.  It's the ingredient that makes ALL the difference in flavor here.  Liquid aminos.  Or just use soy sauce, which is about the same thing.  If you prefer to avoid soy completely, nutritional yeast flakes will give a similar flavor.  Vinegar also works, in the same tiny amount.  The cornstarch, coconut flour, or xantham gum thicken the water so it will better stay mixed with the oils.

This is spreadable when used straight from the fridge.  It’s fantastic on toast, muffins, and waffles.   It has about the same fat-to-water ratio as dairy butter (80:20).  You can cook with it just like real butter, too.  It can be creamed with sugar for cakes and cookies.  Use it cold from the fridge to do this, and don’t beat it longer than about 45 seconds or it begins to melt a little.  This spread can be mixed with an equal amount of honey to make honey butter.

If you’d like a firmer consistency, like sticks of butter, increase coconut oil to ¾ cup and reduce liquid oil to ¼ cup.

Turmeric and paprika give it a nice color without  affecting the flavor.  Turmeric adds bright yellow so a little goes a long way, and paprika lends a warm pinkish orange.  Both will deepen after a day. Combine a pinch of each (just under 1/16 tsp) for the best color.  If you make this using olive oil, the buttery spread has a greenish hint to it which paprika helps eliminate.

Dairy-free Buttery Spread

2 Tbsp. water
1 tsp.  cornstarch OR coconut flour OR 1/4 tsp. xantham gum
1/8 tsp. liquid aminos or soy sauce or vinegar OR scant ½ tsp. nutritional yeast
½ tsp. salt
A pinch each turmeric and paprika, optional (for color)
½ c. coconut oil, softened just til creamy and stirrable
½ c. olive oil or other liquid oil like canola

In a glass 1-cup measuring cup, stir together water and coconut flour.  Microwave until it boils, stir until smooth.  (You’ll need 3 T water if boiling this in a pan on the stove.) Mix in the liquid aminos, salt, turmeric and paprika.  Set aside to cool. 

After it’s cooled to nearly room temperature, mix in the coconut oil, then whisk in olive oil until smooth.  Put mixture in the fridge to chill.  Stir after it starts to thicken, about 15-30 minutes. 

Store covered in the refrigerator.  Makes just over 1 cup. (9 ½ oz, or 3 T. more than 2 sticks of butter)

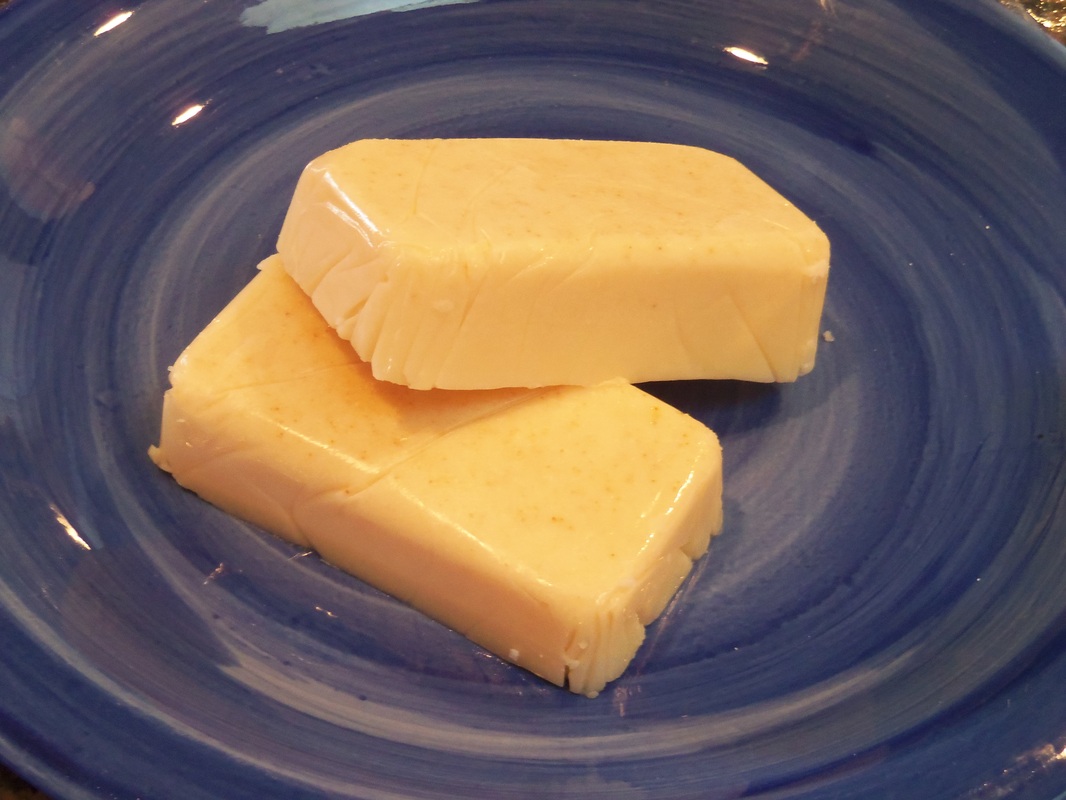
If you want a firmer consistency to form “sticks” of butter, after it’s just started thickening in the fridge and you’ve stirred it, pack it into whatever molds you have.  I use mini loaf pans, filling them on a scale so each stick weighs 4 ounces.  Put in the freezer to solidify. After they’re hard, pop them out of the molds and store in ziptop bags or wrapped in plastic.  Label and keep in the freezer for longer storage, or keep in the fridge for shorter-term use.

Picture
12 Comments

Pizza and Pina Colada Smoothie

12/5/2012

0 Comments

 
Picture
Between helping a sick 7-year-old catch up on homework, driving the carpool today, running kids to appointments, and half of them needing to be at their church youth activities an hour later, I needed an easy and quick dinner tonight.  I had a batch of bread dough rising, so I heated the oven to 450 F, took a loaf's worth of dough, rolled it out to fit a greased cookie sheet, and baked it for ten minutes.  While it cooked, I pulled out shredded cheese, opened a can of olives and one of pineapple, and stirred together some red sauce: 1/3 c. tomato powder, 2/3 c. hot water, and 1/4 tsp. salt (or use one 8-oz can of tomato sauce), then spices to taste: a few good shakes of oregano, basil, black pepper, onion powder, a pinch of fennel... whatever you have and smells good with it. 
Spread the sauce on the hot pizza crust, sprinkle on the toppings, then put under the broiler for two minutes, until bubbling.  If you want a few more mixing/cooking details, see this other post.

Since I'd only used part of the can of pineapple and also had some coconut milk in the fridge, I made Pina Colada:   

1 (20 oz.) can of pineapple (or almost a can, in this case)
1/2 cup coconut milk (or use 2-3 Tbsp. shredded coconut and 1/3 c. water)
Half a tray of ice cubes or one handful
1 Tbsp. mild molasses
1 drop lime essential oil or 1/4 tsp. lime zest (optional but adds just the right touch)

Combine in a blender; turn on high until smooth.  Add a little sugar or honey if it's not sweet enough.

I didn't use any more sugar; the lime boosted the flavor enough that the drink didn't really need anything else.

To the pizza and drink, add a salad or other vegetable, and there's supper!

0 Comments

Meat rub for a roast

9/29/2012

2 Comments

 
Picture
My husband loves roast.  Tender, flavorful roast, cooked along with tender, sweet quartered onions and  carrots.  He remembers having this every week for Sunday dinner. 

He doesn't get it so often now, with the budget cuts of meat costing $3/lb!

Sometimes what I do make doesn't quite measure up to his fond memories, but this one did.  He raved about it for days.

This makes enough spice mixture  for a 2 ½ -3 lb. roast.  You can make a much bigger batch and save the extra it for future meals. You can vary the spices according to what you have and what sounds good.  This one is good on not only beef, but also chicken, fish, and pork.

Meat Rub- using essential oils
1 ½ tsp. salt
1 tsp. paprika
1 drop (or 4 tiny drops) garlic oil 
1 drop (4-5 tiny drops) oregano oil
1 drop (3-4 tiny drops) rosemary oil
2 tiny drops fennel oil (OK without but fantastic with)

I rubbed this on the top, then seared the roast only on the bottom.  To sear, put 1-2 Tbsp. oil in the bottom of a large pan, heat to almost smoking, and then add the roast.  Cook 2-4 minutes, until the bottom is well browned.  Add potatoes, peeled and quartered onions and carrots and sprinkle them generously with salt, 1/4-1/2 tsp. salt per pound of vegetables.  Add about 1 cup of water.

Cover and simmer (or bake at 350 F) for 3-4 hours, or until roast is tender, checking periodically to make sure the water hasn't all boiled away.

Meat Rub- using dried herbs
2 tsp. dried rosemary
1 tsp. fennel seeds
1 ½ tsp. salt
1 tsp. paprika
1 tsp. garlic powder 
1 tsp. powdered oregano OR 2 tsp. dried oregano leaves 

Put the rosemary and fennel in a small non-plastic bowl and grind them using the bottom of a glass spice jar or similar. (If you have a mortar and pestle, use them!)  Add the salt, paprika, garlic powder, and oregano.  Stir to combine, then rub the whole mixture over the roast.


2 Comments

Simplest Guacamole

7/30/2012

1 Comment

 
Picture
Would you like some super-easy guacamole to put on top of your cheap homemade burritos?  Here's a recipe you can make with your eyes closed!

Don't skip using the citrus juice or vinegar; the acidity prevents the avocado from turning brown (oxidation).

Simplest Guacamole

1 avocado
1 Tbsp. lime or lemon juice, 
       OR 1 Tbsp. vinegar and 1 drop lime or lemon essential oil
Salt to taste
chili powder to taste (optional)

Mash the avocado with the juice.  Sprinkle with salt.

You can jazz this up many ways: other flavor options are to stir in chopped or pureed tomato or onion, a little salsa, mixed in diced jalapenos, chopped cilantro, or some sour cream. 

This can also be made into an easy salad dressing: increase juice to 2 Tbsp and stir in 3 Tbsp. olive oil.  To make it even creamier- and lighter-, puree this along with a medium-sized cucumber. A big handful of cilantro added before blending provides a nice flavor boost.  If the dressing is too thick, add more lime/lemon juice and oil.

1 Comment

Convenient Fresh Lemon Juice

6/2/2012

0 Comments

 
Have you ever needed the juice of half a lemon, or just a couple teaspoons of it, only to 1) not have a lemon, or 2) not want to mess with it?

I have.  Lots. 

Besides that, sometimes lemons are cheap, and sometimes they're pricey, so I stock up only when they're cheap.  To take advantage of good prices and a free hour in the day, I make frozen lemon juice.  Or lime juice.  Or grapefruit.  Whatever.  I usually do this when I have 3-12 of whichever fruit I'm using.
Picture
If you want to use or save the zest, start by washing and drying the fruit.  Take the zest off with a microplane, a zester, or a vegetable peeler, and set it aside on a plate.  To see one way of storing it for later, see Homemade Orange Flavoring.  

Juice the fruit, then pour the juice into ice cube trays.  My trays take 1 cup to fill the whole thing, which means each of the 14 spots holds just under  1 Tbsp.   Yours may be different.   After they're frozen, pop them out and store in a ziptop bag.  Be sure to label it.

One medium lemon contains 2-3 tablespoons of juice, so 2-3 cubes will be the right amount.  One lime has about 1 1/2 - 2 Tbsp. of juice, so 2 cubes is about right for a whole one. 

When I want some warm lemon water, I heat a cupful of water, then drop a lemon juice cube into it and stir to melt. 

These are also good to toss into a pan sauce, especially for chicken or fish.

And if you add one to a fruit smoothie, it perks up the flavor.

You'll find a ton of ways to use these!  -what are your favorites?

0 Comments

Two-way Tartar Sauce

5/30/2012

0 Comments

 
Have you ever made tartar sauce?  It's simple, delicious, and has only the ingredients YOU put in it!  (No questionable preservatives, etc.)
Picture
Homemade Tartar Sauce

½ c. mayonnaise
1 T. chopped pickles (or use pickle relish)
1 T. minced onion
1 T. lemon juice
salt & pepper to taste

This is best if chilled at least 30 minutes, but still good if eaten right away.   Makes about 2/3 cup.


Now, how often do you really use all  of that tartar sauce?  You can stir it with a couple boiled and cubed potatoes, to make it into potato salad, or try this.....

Picture
Second-Day Tartar Sauce-      Ranch Dip!

To a half batch of tartar sauce (about 1/3 cup), add

1/4 tsp. dill weed
1/4 tsp. parsley
1/4 tsp. onion powder (recipe here)   
         or 
1 ½ tsp. minced chives
a dash of garlic powder, opt.

Voila!

There were NO leftovers this time.  :D

0 Comments

Taco Meat too spicy?

4/27/2012

8 Comments

 
Picture
Did you add a little too much chili?  or maybe the lid fell off the salt shaker and now it's salty enough to kill a cat? 

When we're cooking from scratch, sometimes we get carried away with spices.  Are you stuck eating the whole batch because now your children refuse to touch it?  Or are you tempted to throw it out?

My sister-in-law asked my sisters and I what we would do.  Apparently her favorite way is to rinse the meat in a colander under running water, then return the meat to the skillet and add spices more cautiously.  Someone on Facebook said that was disgusting and would result in soggy meat. 
I'd be cautious about how much grease could go down the drain that way, potentially clogging it, but that's actually a good solution.  The meat won't be soggy if you reheat it to drive off an excess water.

Another solution is to mix something else in with it to dilute the spice:
-plain cooked oatmeal or cooked cracked wheat (a really cheap meat extender!)
-plain refried beans
-a can of drained beans (black, kidney, or pinto)
-a half can of tomato sauce (cook more if this is too soupy)

The whole point is- if the food didn't turn out the way you intended, instead of chucking it, come up with a way to fix it or repurpose it.  If that doesn't work, you're no worse off than before!
8 Comments

Roasted Broccoli

2/13/2012

1 Comment

 
Picture
What are you going to have for dinner on Valentine's Day? 

How about broccoli?  No, really..

If you've never had roasted broccoli, you're in for a great surprise.  Some of my kids like regular cooked broccoli, and some don't, but ALL of them like it when roasted. 

The high heat, cooking it close to the bottom heat, along with a touch of sugar, help bring out the caramelized sweetness that otherwise is locked away, far from my tastebuds!
The photo shows the Cuban version, below.

Roasted Broccoli

1 ½ lbs. trimmed broccoli
2 Tbsp. oil
½ tsp. salt
1/8-1/4 tsp. pepper
¼ tsp. sugar (honey works as well)

Preheat oven to 475 degrees (no, not 375!), put the oven rack in the lowest spot.  Cut the broccoli into florets.  Save the stems; peel off the tough outer layer, and cut about ¼” thick.  Drizzle with oil, sprinkle with salt, pepper, and sugar.  Toss to coat.  Spread on a cookie sheet and put it on the lowest rack.  Cook for 14-18 minutes, until some parts are deeply browned.

This basic recipe can be made a thousand different ways, using different vegetables, combinations, and/or spices.  Here are a few ideas, still using broccoli.

Cuban Broccoli:
Use 1 lb. broccoli and 2 onions, cut into 8 wedges each.
Into the oil, mix 2 drops lime essential oil, or 1 tsp. lime zest.  Use the same amount of salt, pepper, and sugar, but also add ½ tsp. cumin.  Roast the same as above; when done, toss with 1 Tbsp. lime juice. 

Italian Broccoli:
Before roasting, add ¼ c. pine nuts, 4 medium cloves garlic, sliced in half.  When roasted, sprinkle with ¼ c. Parmesan cheese, and fresh basil leaves, chopped.

Broccoli, Sausage, & Pasta
On that lowest rack, at 475, roast 4 oz. Italian sausage for 5-6 minutes, until sizzling.  Add 1 lb. broccoli, cut smaller, 4-6 cloves garlic, sliced, and 1 or 2 red bell peppers.  Toss and roast.  Meanwhile, bring 1 lb. pasta to a boil; cook til al dente, then drain.  Stir in the roasted mixture and serve immediately.

1 Comment

Pickle juice and exercise

12/8/2011

2 Comments

 
"No woman ever has enough time, enough energy, and enough strength to do all the good things that are in her mind to do.  We have to have the help of the Holy Ghost to take care of the most essential, and then the necessary, and then fill in the nice-to-do things around that."  - Julie B. Beck, president of the Relief Society, of the Church of Jesus Christ of Latter-Day Saints


Boy, is that right!  I oughta be in bed right now, judging by what happened last night. 

Like any self-respecting American woman, I intend to exercise on a regular basis.  Yesterday I managed to get on the treadmill for just over a half hour.  The only problem was the time: ten p.m.

So I walked, and walked, and walked, as I balanced my reading book on the treadmill's control panel.  The book had to be held to stay up and stay open, so I alternated which hand could swing freely, and which stayed put.  Since the book (Seven Miracles That Saved America) was more interesting that paying attention to which side of the treadmill I leaned towards, I wandered too far to the side and whacked the back of my hand on the rail.  Now I have a big blood blister there. 

After I finished, it was time to stretch out.  So I did, sitting on the floor with my book still in hand.  After a while stretching, I  woke up.  As in, while sitting up, reading and stretching, I had fallen asleep.  Totally, completely asleep. 

So that's how well my intentions end sometimes!

Anyway, if you thought from this post's title that the pickle juice was somehow a secret to exercising, get your hopes back down. :-)  They're not even related, as far as I can tell.  If you find out differently, please let me know...

It's just that something new dawned on me yesterday-  pickle juice is useful.  Sure, I've always used a tablespoon or two in homemade Thousand Island dressing, but the rest gets dumped. 

What IS that pickle juice?  Basically, it's vinegar, with salt, spices, and sometimes sugar.  So if you find (or make up) a recipe that needs those things, you can use pickle juice!   I even found a recipe online for pickle juice soup (which got surprisingly good reviews).  Try it in place of the vinegar in a tuna salad, egg salad, potato salad, pasta salad, etc.  (The flavor will penetrate better if you pour it over the potatoes or pasta while still warm.)  Or make it into a vinaigrette or creamy dressing; in a pan sauce for meat- especially fish; poured over a roast (vinegar helps tenderize meat); pour it over cooked beets to make 'instant' pickled beets (or use another vegetable- try Dilly Green Beans), or do whatever else you can think of!

Have you ever been tempted to buy a bottle of fancy flavored vinegar?  Look at that, you had some in your fridge all along!

2 Comments

Substitutions for alcohol in recipes

10/11/2011

0 Comments

 
Picture
Alcohol is added for the flavor it gives, as well as for the liquid it adds.  Sometimes you can come up with a totally different flavor that you’ll like.  For instance, in a sweet dish or beverage, try adding some cream soda or other soda pop, coconut milk, juice or other liquid instead of liquor.  In a savory dish, to replace the “umami” flavor from alcohol, use some complementary liquid (water, milk, broth, clam juice, soy sauce, etc.) and/or herbs or spices for flavor.  Foods that are high in that ‘umami’ (savory) flavor include aged cheeses (like Asiago, sharp Cheddar, or Parmesan), soy sauce,  Worcestershire sauce,  anchovies or other fish, shellfish, dried seaweed, Chinese cabbage, vinegars, pickled foods, spinach, tomatoes (especially dried ones), mushrooms.  Cured, aged, or fermented foods are almost always high in “umami”.  Add whatever sounds good with your recipe; they’ll add a lasting depth to the dish’s flavor.

For the substitutions below, I relied heavily on an old cookbook I have, Entertaining Without Alcohol, by Dorothy Crouch.


In place of…       Use this…

Almond Extract
Replace some of the flour with an equal amount of ground almonds, or replace some of the shortening/oil with the same amount of marzipan.  The dish will be a little grainy.

Brandy
“Burnt” sugar (caramel) syrup: melt sugar until dark golden.  The darker it gets, the less sweet it will be; too dark  will be bitter.  Add an equal amount of water, stirring in drop by drop as it will splatter.  A little goes a long way; use 1 Tbsp. or less. 

Calvados or Applejack
Apple cider (fresh, if you can get it).  The dish will taste sweet if you use more than ¼ cup of this.

Cassis
Blackberry juice, or add water to blackberry preserves/jam/syrup.  Black currant or elderberry may be used instead.  If you have the fresh fruit, cook and press it through a sieve if you like.

Cognac
Apple cider with 1 Tbsp. dark brown sugar per ½ cup of cider
Reduce sugar in the recipe

Curacao, Grand Marnier, or Cointreau
Frozen orange juice concentrate, or tangerine juice.  For Curacao, also add 1 tsp. grated orange zest  (or a little orange oil or extract) per ¼ c. concentrate
 
Framboise
Replace with an equal amount of unsweetened raspberry juice, or add water to raspberry jam to make it the consistency of juice.  If you don’t have any, orange is usually a complementary flavor, or a little almond.

Lemon Extract
Same as Orange Extract, but use lemons.   Use a light hand; too much oil and peel make a dish bitter.  Use ¼ tsp. of zest or ¼ tsp. dried peel for ¼ tsp. of extract. 

Orange Extract
The oil you get from bending an orange peel over a dish, plus 1 Tbsp. grated orange zest.  Or use 1 Tbsp. dried orange peel.

Red Wine
Beef broth, tomato juice, and/or vegetable juice (like V-8).   Don’t substitute cream of tomato soup; it’s too sweet.
Reduce salt by ¼- ½ tsp. for each cup of broth used.

Rum, Light
Simple syrup made using light brown or granulated sugar
Reduce sugar in the recipe

Rum, Dark
Simple syrup made using dark brown sugar
Reduce sugar in the recipe

Sherry

Replace 1 Tbsp. of  butter or oil with 1 Tbsp. walnut oil, or add a couple tablespoons finely chopped walnuts.
 
Vanilla Extract
Use vanilla sugar, vanilla syrup, or vanilla ice cubes.  See under this chart for instructions.

White Wine
Replace with an equal amount of chicken broth, fish stock, or clam juice.  If you don’t need much flavor, use water or a little apple cider vinegar mixed with broth.
Reduce salt by ¼- ½ tsp. for each cup of broth used.

Wine  Vinegars
My understanding of wine vinegars is that there is no alcohol remaining; all vinegar goes through a fermenting stage first.  Specific strains of bacteria are added to this, and they digest the alcohols, leaving acetic acid as a byproduct.  "White wine vinegar", then, means that at one point the liquid was white wine, before the bacteria changed it.  You could just call it "white grape vinegar"; that's what it means.  If anyone knows different than this, please let me know.   If you're still concerned with using them, here are some substitutions:  White wine vinegar: use distilled white vinegar.  For red wine vinegar, use cider vinegar or some other made from fruit (raspberry, pomegranate, etc.) 

                                               
Vanilla Cubes: Chop 2-4 vanilla beans and add 1 quart (4 cups) of water.  Bring to a boil; simmer until reduced by half, to get 2 cups.  Cover and let sit overnight to intensify.  Pour through a fine-mesh sieve or cheesecloth, pressing on the bean bits to get as much flavor out as you can.  Pour this liquid into ice cube trays; it will be enough for two trays. When frozen, transfer cubes to freezer bags.  Remember to label them!

Vanilla Sugar:  Cut 2 vanilla beans into 1” pieces.  Stir them  into a container with up to five pounds of sugar.  Let this sit for a week or more (longer= better flavor).  To use the sugar, pour it through a sieve.  Alternately, you could very finely chop those vanilla beans, and use the sugar with flecks in it. 

Vanilla Syrup: Follow instructions for Vanilla Cubes, above, except:  instead of straining and freezing the water into cubes, mix the liquid with the bean bits in a saucepan with 2 cups of sugar.  Bring to a boil, cover the pot for a few minutes to let any stray sugar crystals dissolve in the steam.  Cool and pour into a jar, including the bean bits.  If the mixture crystallizes, reheat it to dissolve.  Reduce sugar in the recipe by about the same amount of syrup used.


0 Comments

Easy Canning

8/20/2011

0 Comments

 
Picture
Does the thought of canning make you cringe?  Do you think it is an all-day project?

Well, sometimes it does take all day. If you're canning 100 jars of apricots, you know it's going to take a while.

If you have just  a little bit of fruit, though, it can be a little project.

Part of the simplicity of this is that this fruit already contains enough pectin to gel; it just needs sugar and cooking.  Other fruits high in pectin are apples (and things in the apple family, including rose hips), citrus (see Easy Orange Marmalade), and berries.

Picture
I have two black currant bushes in my front yard.  The berries have been ripening at different times, so my kids and I have picked them each week, for three weeks.  Each time we've only ended up with 3-6 pounds of berries, not enough that I felt like breaking out my water- bath canning pot.  So I didn't.  This small amount of jars fit pretty well in one of my cooking pots. 
I started with 6 pounds of washed currants, then pureed them in the blender.

Picture
Then I added sugar; one cup sugar for each cup of puree.

Picture
Stirred it over medium-high heat...

Picture
and kept stirring every now and then, until the mixture coated my spoon; a good sign that it would set up as a gel.  Another test is to drip a little on a cold plate (or granite countertop!), wait about ten seconds, and see how it set up.  It doesn't need to be very thick.

Picture
I poured it into sterilized jars.

The easiest way to sterilize them, if you remember ahead of time, is to run them through the dishwasher on the "sanitize" cycle.  Since I didn't think of that in time, I used bleach- about a teaspoon of bleach in one jar, with 1/4 c. water.  I put a lid on the jar, shook it well, then poured the bleach water into the next jar and repeated until they were all done. I let them sit for five minutes, then drained and rinsed them.

So do you HAVE TO sterilize?  No, but there may be microorganisms in your jars that cause mold to grow in your jelly.  I haven't found that to be an issue when I'm sealing jars, but it shortens the fridge life of unsealed jars.  If the jars are sterilized, I can get a good year out of unsealed marmalade (sometimes longer), but usually closer to 4-6 months if the jars were not sterilized first.

Picture
The pot on the left is deep enough to hold these half-pint jars- they have to be covered by at least 1/2" over the top.  I filled it about halfway with water, and brought it nearly to a boil.

Meanwhile, I prepped the sealing lids by putting them in almost-boiling water, then letting them sit 5 minutes to soften the sealing compound.

Picture
I brought it to a full rolling boil, adjusted the heat so it would maintain that, and set the timer for ten minutes.


Picture
When the timer rang, I turned off the heat and let them sit a minute.  Normally I use a jar-lifting tool to retrieve them, but it's kept with my water-bath canner...

So I dumped half the water out of the pot to expose the jar tops, then lifted them out using a pot holder.

Picture
I put them on a dry dish cloth to cool, with a little space around to help the air circulate. 

Then I cleaned up while occasionally hearing that musical "pop" that announces a jar has sealed.

The whole process took less than one hour.


After they cooled, I took the rings off, washed them, and labeled them with contents and date.

Some of them got an extra label, since I found one for nutritional content of black currants:


Picture
OK, so this is the nutrition for the actual fruit, not fruit with sugar.  It gives me something to work from, though. 

Those currants have some good stuff in them!

Part of the carbohydrates listed is pectin- a soluble, nondigestible fiber.  It helps you feel full longer, and not only helps scrub out your insides, but helps make it hospitable to friendly bacteria (probiotics).  This last feature makes it a "prebiotic". 

Cool stuff.

0 Comments

The Early Garden; Sweet Onion Poppyseed Dressing

4/15/2011

0 Comments

 
Picture
Self-sown baby leaf lettuce. 

I'm really looking forward to eating them in a couple weeks!

Picture
Cabbage seedling.  The tiny green plants around the right side are volunteer flax. 

Right now, in USDA Zone 5, we are still having regular frosts.  The weather alternates between November-like grey skies with snow, and May-like days of bright green grass and leafing trees.  Still, some vegetables will grow happily in these conditions.
Plants that are growing in my garden now are onion, peas, kohlrabi, cabbage, beets, leaf lettuce, carrots, Swiss chard, parsley, rhubarb, horseradish.  There are lots more that will grow now; see Gardening 101 for more of them.  My garden has been pretty neglected this spring so far; the only reason the items above are growing is that 1) I let them self-seed, or 2) they overwintered. 

If you're new to gardening, start with 2-4 kinds of plants.  A great resource for both new and veteran gardeners is the "In The Garden" series  from the USU Extension Office.  This series covers 55 different garden vegetables, herbs, and fruits: from Artichoke and Asparagus, to Wasabi, Watercress, and Watermelon. (You thought I'd say Zucchini last, didn't you!  It's listed under "Summer and Winter Squash".) Each one has 1-2 pages of information on what type of soil the plant prefers, how much sun it needs, what nutrients it needs to thrive, and more.

If you wanted to start tomatoes or other plants indoors, you still can.  Remember that some things can be planted directly in the garden as seeds now (see above).  If you can avoid transplanting, it saves the plants some stress.  One of my favorite garden helpers is called a Wall-O-Water.  Frost-sensitive plants, like tomatoes, peppers, and watermelon, can go outside even now, if they're protected by them.  Most garden centers sell them, three to a package, for around $10.  Use them year after year, too.

If you're still looking for indoor seed-starting information, here's a quick summary:

Simple version of instructions for starting seeds indoors

Use any clean container with good drainage.  You can use commercial planting trays or pots, or poke holes in the bottom of yogurt containers, paper cups, eggshell halves, or whatever you have.  You can even use cardstock or a couple layers of newspaper to form little boxes or pots. Or cut 1 ½-2” lengths of toilet paper tubes to fill with dirt and plant in. Use a cookie sheet or plastic bin’s lid underneath your planting pots, to protect surfaces below. Plant the seeds in a lightweight mix, not garden soil.  Keep moist and dark, and covered, until they sprout.  Putting them on top of a freezer or furnace will warm the soil and help them germinate.

After sprouts appear, for best results, use a fluorescent shop light suspended 4-6” above the plants.  14-18 hours a day is ideal.  Plants will be tall and scraggly when they don’t have enough light.  They sometimes will fall over, damage the stem that way, and die.   Water them only after the top of the soil has dried out. If you’re not sure how often to water, poke your finger down ½” below the soil’s surface.  If it feels cool there, it is still moist. Overwatering leads to fungus and diseases.  Use a little fertilizer in the water every day. 

They can be transplanted after their second set of true leaves appear.   They’ll only be a couple inches tall if they’ve had enough light.  If the garden’s not ready for them, you can transplant them into larger pots so the roots can keep growing.  You may use plastic containers (yogurt cups, cottage cheese containers) with holes punched in the bottom.

 
For more information, see:


Starting vegetable seed indoors:
http://extension.usu.edu/saltlake/files/uploads/pdf/Starting%20Seed%20Indoors.pdf 

http://extension.usu.edu/htm/news-multimedia/articleID=12035

 
Space requirements for vegetables: 
http://extension.usu.edu/htm/publications/by=category/category=

__________________________________

Sweet Onion Poppyseed Dressing
1  Tbsp. poppyseed
1 Tbsp. prepared mustard
1 c. light olive oil (or other oil)
½  c. vinegar (I prefer apple cider vinegar here)
½  c. sugar*
1 tsp. salt
1 small onion, or a piece the size of a small egg 

Mix everything in a blender until smooth.

*If you want to reduce the sugar, cook a whole medium or large onion in 1 Tbsp. of the oil until tender.  Cover and cook on low another 10 minutes, until caramelized.  This makes it sweeter.  Mix the dressing as above.  Add 1-2 teaspoons of sugar for best flavor.  Use immediately or store in fridge. 

This recipe came from a neighbor ten years ago; (it's been modified a bit by me) and was from her grandmother.  The salad she poured it on was made with spinach, lettuce, sliced onion, crumbled bacon, sliced mushrooms, peas, Swiss cheese, and cashews.  One of my favorite salads.  Ever.

0 Comments

Cookbook- Miscellaneous, Pies, Quick Breads 1

4/4/2011

0 Comments

 
Picture
Different pies and piecrusts.  The card only covers cream pie varieties, but has a few different crusts.

Picture
Did you want to see closer?

This one is chocolate-peanut butter cream pie.

Picture
Apple Cider Syrup is YUMMY.  We use the recipe to make many flavors.  Our latest favorite is made using mango juice.

Picture
Crunchy on the outside, velvety on the inside, simple Drop Biscuits.  The batch pictured uses about half whole-wheat flour.

Picture
Craggy, crisp, and hearty- use the Drop Biscuit recipe to make Drop Scones.  Here, I swapped some oats for some of the flour, and stirred in chopped figs and toasted nuts.

Miscellaneous card 1 apple cider syrup, basic syrup, easy jam, cooking grains, 5-min marmalade

Miscellaneous card 2 granola, granola bars, home remedies, seasoned salt, seasoned flour, spice chart 

Pies  cream pie filling, shortbread crust, meringue, crumb crust, pat-in-pan crust, traditional crust

Quick Breads card 1  drop biscuits, English scones, biscuit mix, soft breadsticks, rolled biscuits, shortcake, biscuit dough ideas

0 Comments

Seasoned Flour; Brigham Young 'wheat vs. gold' quote

3/31/2011

1 Comment

 
Picture
image courtesy photos8.com

Picture
Seasoned flour is fabulous to coat any meat before cooking.  It's also delicious added to onion-ring batter.  All you do is mix 1 cup pancake batter with 1 Tbsp. seasoned flour.

Picture
Slice an onion and separate it into rings.  I like to leave the center tiny rings together.  Dip into batter, and drop into 375-degree oil.  It will take only 1-2 minutes per side to cook.  Drain on paper towels.

Picture
One giant onion (18 ounces!) and a half-hour later, we have a giant pile of delicious onion rings. 

This recipe is kind of a shake-and-bake thing, but cheaper and fresher.  It is really delicious with any kind of meat- chicken, beef, pork, fish, you name it.  Put ½ cup of this on a plate, then dredge (dip) raw meat in it, coating both sides.  The mixture is pretty salty, so use serving-sized chunks of meat.  If you’re going to coat chicken-nugget-sized pieces, combine mixture with an equal amount of cracker crumbs or flour, or the meat will be too salty.  (Lesson learned the hard way.)  Heat up 1-4 Tbsp. of oil in a saucepan on medium-high heat, then cook the meat until as done as you like.  Any leftover (used) seasoned flour can be kept in the freezer until you need it, or mix it into a batch of biscuits, breadsticks, or cornbread.  My new favorite use for seasoned flour is Onion Rings: make pancake batter (any recipe, don’t add oil or butter) but add 1 Tbsp. of Seasoned Flour to it for each cup of flour or pancake mix you used.  Slice an onion and separate it into rings, dip them into the batter, and deep fry a few at a time until golden.  NO restaurant onion ring in my memory can compare to this!

 Seasoned Flour 
4   cups   flour   
3   Tbsp.   seasoned salt
3   Tbsp.   garlic salt   
3   Tbsp.   onion salt   
3   Tbsp.   pepper   
3   Tbsp.   salt   

Mix together and store airtight in cupboard.  Makes about 4 ½ cups.

 If you don't have garlic salt or onion salt,  use 
4 cups flour
3 Tbsp. seasoned salt
1 1/2 tsp. garlic powder
1 1/2 tsp. onion powder
3 Tbsp. pepper
1/4 c. salt
 

If you don't want to keep more than a quart jar's worth, give the extra 1/2 cup to a neighbor to try- they'll want the recipe too!

_______________________ 
Have you heard this before?  It’s a quote from Brigham Young  (if you’re short on time, just read the bold):

  “Were I to ask the question, how much wheat or anything else a man must have to justify him in letting it go to waste, it would be hard to answer; figures are inadequate to give the amount. Never let anything go to waste. Be prudent, save everything, and what you get more than you can take care of yourselves, ask your neighbors to help you. There are scores and hundreds of men in this house, if the question were asked them if they considered their grain a burden and a drudge to them, when they had plenty last year and the year before, that would answer in the affirmative, and were ready to part with it for next to nothing. How do they feel now, when their granaries are empty? If they had a few thousand bushels to spare now, would they not consider it a blessing? They would. Why? Because it would bring the gold and silver. But pause for a moment, and suppose you had millions of bushels to sell, and could sell it for twenty dollars per bushel, or for a million dollars per bushel, no matter what amount, so that you sell all your wheat, and transport it out of the country, and you are left with nothing morethan a pile of gold, what good would it do you? You could not eat it, drink it, wear it, or carry it off where you could have something to eat. The time will come that gold will hold no comparison in value to a bushel of wheat. Gold is not to be compared with it in value. Why would it be precious to you now? Simply because you could get gold for it? Gold is good for nothing, only as men value it. It is no better than a piece of iron, a piece of limestone, or a piece of sandstone, and it is not half so good as the soil from which we raise our wheat, and other necessaries of life. The children of men love it, they lust after it, are greedy for it, and are ready to destroy themselves, and those around them, over whom they have any influence, to gain it” (Journal of Discourses, 1:, p.250).

Picture
The onion rings and some hushpuppies.  This was from a 2-cup batch of onion ring batter.  Next time I'll use 1 cup and a normal-sized yellow onion.

Picture
If you have extra batter, you can add a little oil or melted butter (for tenderness), and stir in cornmeal and/or flour until it's thick enough to get round spoonfuls.  Also nice with some dried parsley for color.  Drop the spoonfuls into the hot oil, flip to the other side after a minute.  Drain on paper towels, too.

1 Comment
<<Previous

    Need a Search bar?
    One day I may upgrade my website-- but until then, use your web browser search bar. Type in my web address and what you're looking for, like this-- 
    www.theprovidenthomemaker.com  pumpkin --  and you should get results.


    Author

    I'm a disciple of Christ, a member of the Church of Jesus Christ of Latter-day Saints, a family-defending, homemaking, and homeschooling mom of eight children, two of whom sometimes can't have milk or wheat. Growing up on a farm in a high mountain valley, my parents taught me to 'make do', work hard, smile, and help others.  I love cooking, learning, growing food and flowers, picking tomatoes, and making gingerbread houses --which CAN be made allergy-friendly-- with my children.  I hope you find something to help you on my site!

    Archives

    April 2024
    July 2023
    April 2022
    September 2021
    March 2021
    December 2020
    April 2020
    March 2020
    February 2020
    January 2020
    December 2019
    November 2019
    October 2019
    September 2019
    August 2019
    July 2019
    June 2019
    May 2019
    April 2019
    January 2016
    November 2015
    October 2015
    September 2015
    March 2015
    February 2015
    November 2014
    October 2014
    September 2014
    August 2014
    July 2014
    June 2014
    May 2014
    April 2014
    March 2014
    February 2014
    January 2014
    December 2013
    November 2013
    October 2013
    September 2013
    August 2013
    July 2013
    June 2013
    May 2013
    April 2013
    March 2013
    February 2013
    January 2013
    December 2012
    November 2012
    October 2012
    September 2012
    August 2012
    July 2012
    June 2012
    May 2012
    April 2012
    March 2012
    February 2012
    January 2012
    December 2011
    November 2011
    October 2011
    September 2011
    August 2011
    July 2011
    June 2011
    May 2011
    April 2011
    March 2011
    February 2011
    January 2011
    December 2010
    November 2010
    October 2010
    September 2010

    Categories

    All
    Alcohol
    Alternate Cooking
    Appearances
    Apple
    Apricots
    April Fools
    Aprons
    Bananas
    Beans
    Beef
    Beets
    Bench
    Beverages
    Bonnet
    Bread
    Breakfast
    Budget
    Budgeting
    Cake
    Candy
    Canning
    Carrots
    Cheese
    Chicken
    Children
    Chocolate
    Christmas
    Cleaning
    Coconut
    Comfrey
    Common Core
    Constitution
    Cookbook
    Cookies
    Cooking Oil
    Crafts
    Dairy Substitutions
    Dehydrating
    Dessert
    Dried Fruit
    Earth Oven
    Earthquake
    Easter
    Edible Weeds
    Eggs
    Emergency Prep
    Essential Oils
    Faith
    Family Home Evening
    Fertilizing
    Food Storage
    Fourth Of July
    Freezer
    Frosting
    Fudge
    Garden
    Gardening
    Gingerbread
    Gluten
    Gluten Free
    Gold
    Government
    Grains
    Gratitude
    Hat
    Herbs
    Home Remedies
    Home Repairs
    Homeschool
    Home Storage
    Honey
    Hope
    Inflation
    Leftovers
    Legumes
    Lemon
    Main Dishes
    Mixes
    Mothers
    Noah
    Non Artificial Colors
    Non-artificial Colors
    Nuts
    Oats
    Oil
    Orange
    Paint
    Peaches
    Pear
    Pie
    Pizza
    Plums
    Poem
    Popcorn
    Pork
    Potatoes
    Powdered Milk
    Prayer
    Preparedness
    Projects
    Prophecy
    Pruning
    Pumpkin
    Quick Bread
    Rhubarb
    Rice
    Salad
    Salt
    Sauces
    Self Reliance
    Self-reliance
    Sewing
    Shelf Life
    Shelves
    Sky
    Smoothie
    Snacks
    Soup
    Spices Or Seasonings
    Squash
    Strawberries
    Substitutions
    Sugar
    Summer Fun
    Three Month Supply
    Time
    Tomatoes
    Trees
    Truffles
    T-shirts
    Tuna
    Ultra Gel
    Valentine\'s Day
    Vegetables
    Water
    Watermelon
    Wheat
    Work
    Year Supply
    Zucchini

    RSS Feed

Web Hosting by iPage